In my Gull risk assessment going too far forward is scores highly. OK there isn’t a risk assessment but I did capsize when, soon after buying her, by going to far up the foredeck. Two quick fixes were:
◦ Clip on / off kicker (vang) so if the boom goes over I’m not trapped
◦ Boat hook, it does the forward jobs rather than me
That left one vulnerability. I deploy the anchor from just aft of the shroud. Then the boat hook is used to hook the anchor warp through the bow fairlead. In a breeze / tide this can go a bit hairy. It’s quite easy to find yourself anchored from the gunwale and struggling to get the warp forward it is now loaded up.
Additionally I hear people say, ‘oh I just took a mooring’ something easy on the foredeck but a challenge if attempted in a similar way to anchoring as above.
I did have a continuous loop and a carabiner so I could pull the anchor warp forward. This was less than idea and didn’t solve taking up a mooring.
So Cobner provided to the ideal time to develop and test a mooring and anchoring system to my requirements. Some of the DCA stalwarts gave their input and the final solution came at 3.00 in the morning. There probably is a simpler solution however I’ve tested this a number of times and feel it works well.

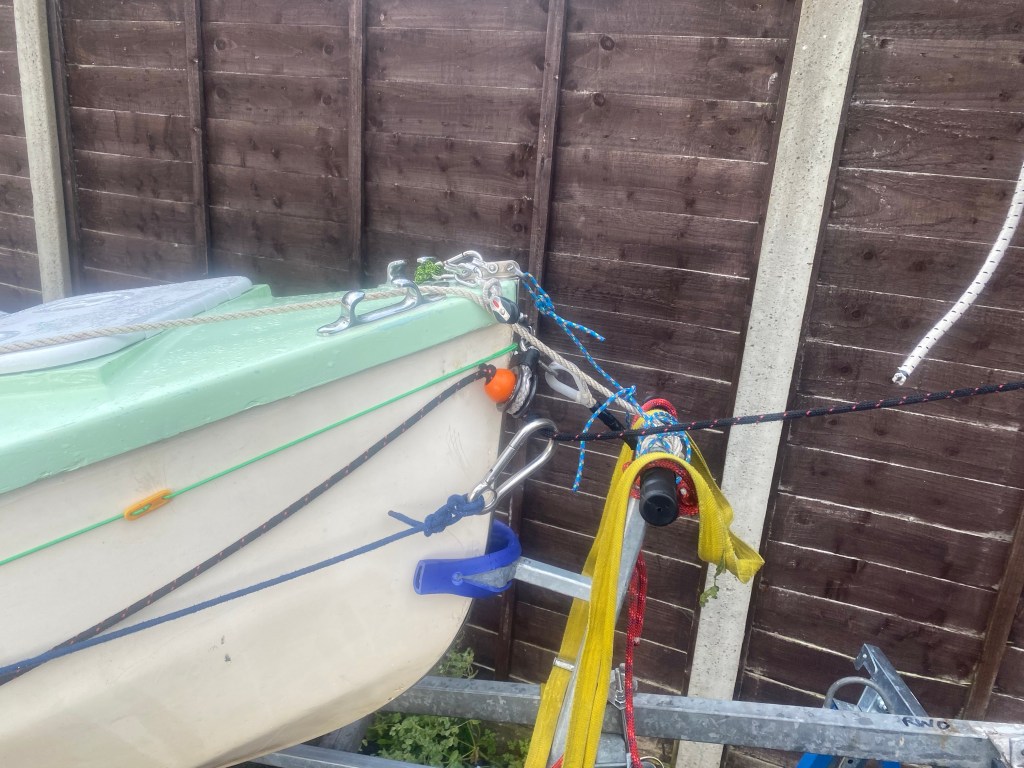
It consists of
- Mooring and Anchoring line> fixed near the shroud leading to a thimble fixed to the stem. There is a ball stopper just aft of the thimble. The line then carries on and ends with a carabiner that ultimately get connected to the buoy or anchor line
- Recovery line> again fixed near the shroud and long enough to get past the bow with another carabiner on the end. The carabiner goes around the foreword part of the Mooring and Anchoring line. This is a large carabiner to allow for weed build up.

Update
In simple terms
Mooring buoy – Clip carabiner to buoy and you are done
Anchor – Clip carabiner to anchor line, anchor and pull in line
Recovery both – pull on the second line
Set up
Both the recovery line and anchor and mooring line are pulled back to cockpit, the anchor and mooring line carabiner should be to hand, as easy as that
Mooring
Simple come alongside the buoy and clip the anchor and mooring carabiner to a suitable fixing on the buoy. Ensure the recovery line is free and let go of the anchor and mooring line. The boat will drop back tethered to the buoy.
To recover, simply pull on the recovery line, the boat will be pulled towards the buoy and when close enough the carabiner can be unclipped from the buoy.

Anchoring
The anchor warp is simply clipped to anchor and mooring carabiner, deploy the anchor and cleat at desired scope. Now simply pull the mooring and anchor line until the anchor and mooring carabiner is at the bow thimble. Mine is set up so that the stopper ball simply is popped over the cleat.

To recover the anchor warp is shortened, then the mooring and anchor line is released. Now the recovery line is pulled, this brings the anchor and mooring carabiner to hand and the anchor can be recovered.
I’m sure some people will consider this overly complex, it’s not an easy thing to explain or even demonstrate but it is really very simple and importantly safe to use.
Update
I have just realised I didn’t mention I carry 3 anchors – on an eleven foot boat.
1) Main anchor – overnight
2) Second anchor – lunch and stern anchor
3) Grapnel, attaches to painter for launching and recovery
This system allows for easy switching between 1 & 2
